INFO ZONEO

Hii Everyone welcome to the information world page here you get amazing Content and information. So just stay tuned and subscribe this page for latest updates.

Join us on YouTube

Breaking

Saturday, July 8, 2023

July 08, 2023

Coral Draw


AND INSTALL CORELDRAW GRAPHICS SUITE 2020

  1. Click on the download button(s) below and finish downloading the required files. This might take from a few minutes to a few hours, depending on your download speed.
  2. Extract the downloaded files. If you don’t know how to extract, see this article. The password to extract will always be: www.mysoftwarefree.com
  3. Disable internet connection.
  4. Start the installer.
  5. Paste key found in serial.txt
  6. Proceed installation. Don’t open yet.
  7. Copy and replace patched file in the path:C:\Program Files\Corel\PASMUtility\v1
  8. Block the following lines in hosts file to prevent registration messages after some days:0.0.0.0 mc.corel.com
    0.0.0.0 apps.corel.com
    0.0.0.0 origin-mc.corel.com
    0.0.0.0 iws.corel.com
    0.0.0.0 compute-1.amazonaws.com
    0.0.0.0 ipm.corel.com
    0.0.0.0 dev1.ipm.corel.public.corel.net

    OR with 127.0.0.1 instead of 0.0.0.0 at the beginning.

    If you don’t know how to edit your hosts file on Windows, check this tutorial.

  9. You now have the full version of CorelDRAW Graphics Suite 2020, without any limitations, installed on your computer.

Required files

File #1 (709.8MB)

Password: www.mysoftwarefree.com

This download is for CorelDRAW Graphics Suite 2020 v22.0.0.412 Multilingual x64

HOW DO YOU RATE THIS POST?

Click on a star to rate it!

  •  
  •  
  •  
  •  

Average rating 4.2 / 5. Vote count: 49

Wednesday, February 10, 2021

February 10, 2021

How to Share Files Between Android and Windows Phone With Feem


How to Share Files Between Android and Windows Phone With Feem

By information world


You have some amazing files on your Android smartphone and you want to send them to your friend's Windows Phone device. But the Internet is down or you don't want to eat up precious megabytes off your data pack. So what do you do to send these files?

There's an easy way and a slightly hard way to get the job done. The easy solution is of course to find a computer and connect both your phones to it. Now simply copy and paste files from one device to another - both will show up as removable drives on the computers. This is as simple as copying stuff from one pendrive to another.

After you've copied the files, accessing them on the Windows Phone can be a little more of a challenge if you're still running on Windows Phone 8, but Windows Phone 8.1 adds a file management system that makes it easy to get to the files after you've copied them. Adoption of Windows Phone 8.1 is also growing steadily so this might not be a problem for long.

If you don't have a computer, then the slightly hard way to do this involves using the same app we recommended for sharing files between iOS and Windows Phone - Feem. There are plenty of other options for Android users, but Feem is still the best choice on Windows Phone. This is what you need to do:

1) Download Feem on Android and Windows Phone devices.

2) Ensure that the iOS and Windows Phone devices are connected to the same Wi-Fi network.

3) Open Feem on both devices.

4) Wait for the app to scan for peers. All devices running Feem on the network will show up in a list

5) .Now tap the right arrow icon on the left.

6)You will see a list of folders on the right. Select the files you want to send from the list of folders on the right.

On Android, you will be able to see and send just about any file you want on your device. On the other hand, Windows Phone users are still limited to sending only photos - Feem's developer says it is working on a new version of the app, designed for Windows Phone 8.1 that will have full file sharing, but for now, for Windows phone, it is better to receive than to give.

  1. Tap the right arrow icon above the ad at the bottom.

  2. Select the device from the list of peers. Now Feem will start sending files.

One thing to note is that Feem cannot run in the background on Windows Phone and shows an annoying permanent notification asking you to open the app. Another problem with Feem's free version is the number of annoying ads in the app. These limitations can be a little annoying, but it's still the easiest free option available right now.

If you use another app to share files between Android and Windows Phone, let us know via the comments.

Monday, February 8, 2021

February 08, 2021

All you need to know about Saudi Arabia's Tawakkalna App


All you need to know about Saudi Arabia's Tawakkalna App


By Information world


The Tawakkalna application developed by Saudi Arabia's National Information Centre to processes requests for movement permits during the curfew to curb the spread of the virus has become a major helplnine for past few weeks. 


The application developed through the close cooperation between the Ministry of Health and the Saudi Data and Artificial Intelligence Authority (SDAIA) was launched on May 4.


According to Saudi Telecom Group, it handles 20,000 calls daily through the Tawakkalna platform by dedicating a call centre of 600 employees through its Contact Centre Company (CCC). 


The Tawakkalna app can be used to issue e-permits for a selected group of government and private sector employees who were exempted from the curfew, and individuals who have medical appointments as well as couriers.


Tawakkalna has features for the service of citizens and residents, for ensuring their safety and comfort that would contribute to facilitating the access of authorized persons to travel permits.


The official page about Tawakkalna on Twitter, says: “You must always keep in mind that pinpointing your exact location of residence is the only way for you to benefit from the app’s range of services and permits.”


The app will also provide the latest alerts and medical news issued by the Ministry of Health about the virus as well as about its spread, ways to prevent it and movement permits.


Tawakkalna can be used for self-disclosure for people who show signs of coronavirus infection and for requesting ambulance service and other important services for the community.


Through the app users can apply for a one-hour permit for a walk in the neighborhood on a daily basis, thereby encouraging walking during this period of lockdown.

Thursday, January 14, 2021

January 14, 2021

How to make a website

How to make a Website within 5 minutes-Simple & Easy

Information world 

14 Jan 2021


 Hey Guys, 

                  Here we tell you that how to make a Website within 5 minutes. Its simple and easy. In this video you get complete process step by step . So start playing the video and earn money. As you know that blooger are earning very much money.


Video link : https://youtu.be/tSSK9AKJOeE


Hope you like it

Monday, January 11, 2021

January 11, 2021

How can I get Google AdSense account approval?


How can I get Google AdSense account approval?
  

There is a simple trick which you can use to get your AdSense account approved for Blogspot domain quickly. If your BlogSpot account have a sufficient number of post (minimum 20+) then it’s easy to get your AdSense account approved. If you have personal domain and host chances of AdSense approval are very high.

  • Buy a custom domain name.
  • Use Google apps to create a domain specific email address.
  • Add pages like About, Contact Ensure you use a clean BlogSpot design.
  • Have at least 10-15 well-written blog posts.
  • Ensure you don’t use copyright images. Here you can find sites to download free images. If you have copied images from Google search, go back & delete it from your blog.
  • Ensure your sidebar looks clean & professional.
  • Apply for AdSense & enjoy!

Even I got my AdSense account approved after almost 8 re-submission.I have explained above clearly, If it is also difficult to understand then please google search “Adsense software udemy”.


.

Thanks 

Hope you like it. 

If you have avy queries ask in comment section.

January 11, 2021

5 ways telecom industry will change in India in 2021


5 ways telecom industry will change in India in 2021

Here's a roundup of some of the major developments expected in India's telecom sector in 2021.

HIGHLIGHTS
  • 5G will be the talk of the town in 2021
  • Airtel, Jio, and Vi could increase their tariffs to drive growth
  • 2G likely to hang on for a little while longer, but 3G services will probably end this year

https://static.hub.91mobiles.com/wp-content/uploads/2021/01/changes-expected-in-telecom-industry-in-2021.jpg

The Indian telecom sector is expected to undergo some major developments this year. The country's 4G penetration is expected to increase further this year; leading telecom operators such as Airtel, Jio, and Vi could increase their tariffs; and 3G services may come to an end. Most importantly, 5G could finally be a thing in India as the Mukesh Ambani-promoted telco Jio is confirmed to launch the network later this year. The government will also conduct 4G spectrum auctions after nearly four years in March; the auction is expected to fetch about Rs 55,000-Rs 60,000 crore to the exchequer. Here's a quick look at some top developments that may change the telecom industry in India in 2021.

5 trends expected to emerge in the Indian telecom sector in 2021


1. 4G recharge price hike

Airtel, Jio, and Vi recharge packs may see a hike this year. Analysts believe that the telecom operator could increase the prices of their tariff by 15-20 percent. Vodafone Idea (Vi) will reportedly be the first telco to increase the prices of its recharge plans, ahead of Jio and Airtel. This will be the second tariff hike from the telcos in three years. Back in December 2019, leading telecom operators, including Jio, Airtel, and Vi, increased their prepaid plans by 25-40 percent in the country. Another round of hikes was expected in the last calendar year but it was postponed to 2021 due to COVID-19 shock, pending clarity on floor prices, and Vodafone Idea's new branding and ongoing network integration.

2. PM Wani free public Wi-Fi

PM Wani aka Prime Minister Wi-Fi Access Network Interface is the government's pet project to elevate wireless internet connectivity in India. The project, which was launched in December 2020, allows unlicensed entities — including small vendors such as ration shops and tea stalls — to provide public Wi-Fi services by obtaining bandwidth from internet service providers. The PM Wani scheme is also said to benefit telcos, which can rely on increased bandwidth to handle the demand.

3. 3G shutdown

2021 could be the end of the road for 3G services in India. After shutting down its 3G networks from Chennai and Bengaluru, Vi has decided to do the same in Delhi on January 15th. As for Airtel, it's also in the process to discontinue 3G services from its network. The telco has already pulled the plug from its 3G services from most regions across the country. That said, both telcos will continue to offer 2G networks due to the feature phone install base. Jio, which only operates in 4G, however, has urged the government to phase out 2G network from the country altogether. The company plans to increase 4G penetration with affordable 4G smartphones.

4. OTP phase-out

Airtel, Jio, and Vi are likely to phase out 'one-time passwords' or OTPs and introduce a new identity verification system. Per a report by ET Telecom, the telcos will soon verify customers using their mobile numbers using a new technology called Mobile Identity. The tech is said to be a secure universal log-in solution that matches the user to their mobile phone to log into websites and applications quickly without the entering usernames and passwords. The new verification system is currently being piloted and would be made available publicly post regulatory approval soon.

5. 5G launch

Last but not the least, 5G! The network is all set to make its debut later this year and Jio will take a lead on it by launching 5G in the second half of 2021 using in-house equipment. "Jio would take the lead in pioneering the 5G revolution in India," Reliance Jio chairman and managing director Mukesh Ambani said at the India Mobile Congress 2020 (IMC 2020). Airtel and Vi will also follow the suit. 5G is the next evolution in mobile network technology and is already available in many parts of the world. The network has low latency and presents use cases such as AR/VR, AI, high-speed broadband, among others. A plethora of 5G capable handsets are already available in the market.

Sunday, January 10, 2021

January 10, 2021

How to Start a Blog using Blogger – A Step by Step Guide for Beginners


How to Start a Blog using Blogger – A Step by Step Guide for Beginners

How to Start a Blog using Blogger – A Step by Step Guide for Beginners
src="https://secure.gravatar.com/avatar/e0b78b66ec86d77d718be592e60a7478?s=26&d=mm&r=g" style="border: none; box-sizing: border-box; display: block; height: 0px; inset: 0px; margin: auto; max-height: 100%; max-width: 100%; min-height: 100%; min-width: 100%; padding: 0px; position: absolute; width: 0px;" />By information world 

Starting a blog in 2021

 can be a superb idea because with the help of blogging you can express your thoughts and share anything with the world. Also If you are wise in this field, then you can earn a decent income from it.

Each day, millions of articles/posts/stories get published in the web, and more than 200 thousand new blogs created. It means more than two new blogs published every second. Isn’t Amazing? So many blogs are springing up daily with their various topics, and many of them became famous in the world. So, now It’s your turn!

Suggested Reading – Why Blog? Here are Some Reasons You Should Start Your Own Blog

So If you’re new to blogging and planning to start a blog for free, then you’re in the right place. In this article, I’ll show you how to create a blog on blogger.com (Google’s own free blogging platform).

Before we start let me tell you some interesting fact about Google Blogger/B

What is Google Blogger?

Blogger.com is Google’s own free blogging platform where you can create a free blog with the .blogspot.com subdomain (for example, yourblogname.blogspot.com) or you can buy a domain (always recommended) to have your perfect website (for example, www.yourdomain.com).

Advantages of Starting a Blog on Google Blogger

  • Starting a blog with Google Blogspot is very easy, and you don’t need any professional skill to operate your blog.
  • Google owns the platform, so you have that trust and credibility.
  • Blogger is free for all, and they never ask for a penny.
  • Though there are many of free blogging platforms available on the web (like WordPress, Weebly, Wix, Tumblr, and others), Blogger.com is the winner of all of them when it comes to giving you freedom and the features offered.
  • You can set up your custom domain there instated of free .blogspot.com subdomain.
  • You can Configure a free SSL Certificate for your blog (by simply turning on HTTPS). Now blogger offers HTTPS version of both type of sites, so no matter if you’re using their .blogspot sub-domain or your custom domain.
  • They provide free simple and responsive templates and also allow you to upload your own theme. In the web lots of free and premium blogger template available, so you can install them and customize as you want.
  • Some cool features like template editor, template designer, and layout editor, are very advantageous. With the help of the template editor, you edit the code of your theme and can customize it as you like. Template Designer used to design the essential elements of your blog and to add custom CSS to your blog. Layout editor helps to place various widgets at different locations on your blog by just dragging and dropping.
  • Blog post publishing and management system are very easy to use.
  • The communication system is good also. You can use its default comment system or can set up Facebook, Disqus, Google Plus Comments easily.
  • Blogger post editor provides all essential tools to write an excellent blog post. It allows you to edit or modify your article, search description, labels, location, custom permalink, custom robots tags, image alt tag, blog post scheduling, errors, and redirections, etc.
  • You can monetize your site with Google AdSense and other programs like affiliate marketing easily unlike other platforms.
  • Like other CMS (Content management system), Google blogger also lets you take backup your data. So, if something wrong happens with your site, then you can restore it with your backup.
  • Also later, if you wish to move on other platforms (like WordPress, Wix, Weebly) then by using their plugins, you can easily switch to them without losing anything.

So, I hope now you can understand, why starting a blog on Blogger.com is beneficial for you.

OK, now let’s see how you can start your blog with blogger using our step-by-step guide below.

How to Create a Free Blog with Blogger.Com

Sign Up for a Google Account

You need a google account to access your blogger dashboard. So just signup for a Gmail or any Google product to proceed. If you already have an account then skip the step and log in to your account.

Sign in to your Blogger Account

Go to blogger.com homepage and then SIGN IN to your account using your Google account credentials.

Choose a Blogger Profile

Once you signed into your Blogger account, for the first time, it will ask you to set up a profile for your Blogger blogs. You can choose your Google Plus profile or limited blogger (BlogSpot) profile. So pick any of them and then proceed to the next step( I’ll recommend you to choose google plus profile).

Create your blog

Now you will be able to see the blogger dashboard, and like my given image, you can choose “New blog” or “CREATE NEW BLOG” option to start your blog creation.

Choose your blog title, address and theme

After clicking ‘new blog’ or ‘create new blog’ option, a new window will be open like the following screenshot below and there you need to fill details. Now enter your blog name, address, and then pick a theme. After that, you need to click ” Create blog” button to finish your initial blog setup. Don’t worry about your selection; you can change/modify them later also.

Lunch your blog

once you finished the initial blog setup process, you can able to see your blog dashboard like my given screenshot below.Your blogger blog is live now and ready to start blogging. You can check it by clicking the “View Blog” link, or you can visit directly by typing your blog address (URL) at any web browser.

Great! You have finished your google blog creation. Now your blog is running, and it’s live for all.

However, just creating a blog is not enough. There are many changes that you need to do after creating your blog setup. Now it’s time to optimize it for more search engine visibility and better user experience.

Steps to Optimize your blogger blog

In your blog dashboard left side panel you can see the “Setting” option. Now click there to edit some stuff.

How to Start a Blog using Blogger - A Step by Step Guide for Beginners 1

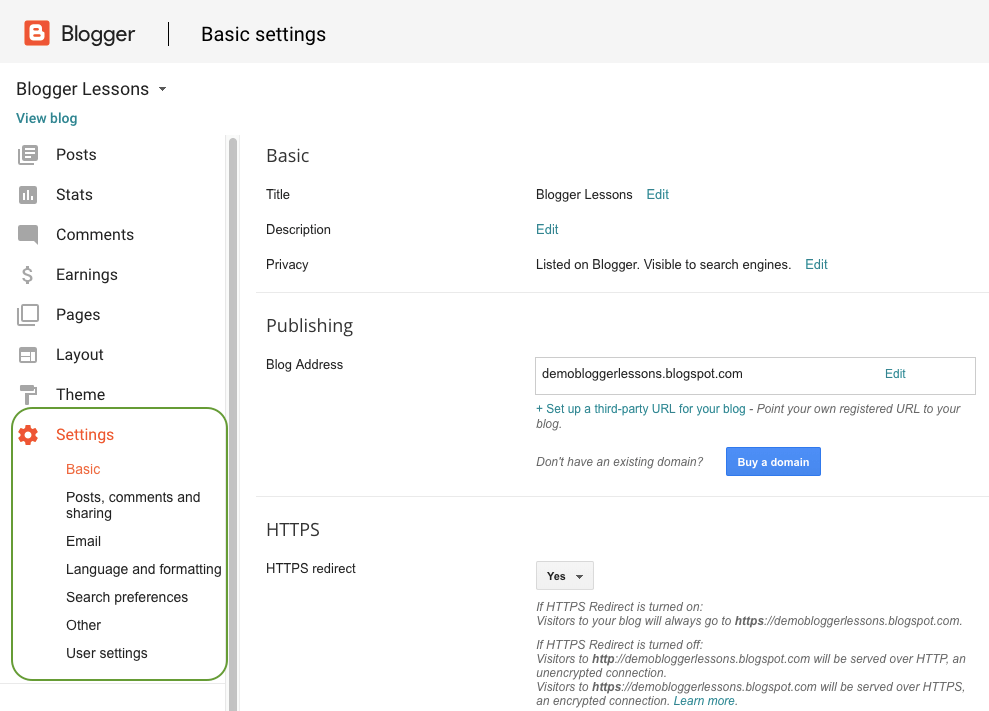
Add a Description for your Blog

How to Start a Blog using Blogger - A Step by Step Guide for Beginners 2

Adding a description on your blogger blog is very necessary, it helps to describe your reader and search engines that what is your blog about. You can set it by selecting the “basic” settings option under the main settings panel.

Edit your post, comments and sharing settings on blogger

How to Start a Blog using Blogger - A Step by Step Guide for Beginners 3

This section will help you to optimize your blog homepage, and you can set up commenting rules for your blog readers. These settings are pretty self-explanatory, and if you have any difficulty to understand, then you can click on the help symbol (question mark symbol) to get more details about it.

Edit and modify Blogger Search Preference Settings to Optimize your Blog SEO

In this section, you can optimize your blog for search engines. With the help of these setups, you can able to get better ranking in search engine.

How to Start a Blog using Blogger - A Step by Step Guide for Beginners 4

Edit meta tags: A meta tag is a brief and concise summary of your blog or website. It supposes to install after the title of the page. The user of a search engine focuses on the description of the post after reading the title of the post. So, Keep in mind that it is very much necessary that your meta description must be related to what you have written in your blog. Your meta tag description must be written within 150 characters.

Custom page not found: When someone lands on your site through a URL that no longer exists, you can set a message to them that the page doesn’t exist. You can set any custom text or HTML message instructing them what to do next.

Custom redirects: Using this feature you can redirect your full-length permalinks to a shorter one and also you can redirect your broken links to your site. Bloggers custom redirects only support redirection within the same blog URL, so this isn’t suitable if you’ve changed your blog domain name.

Crawlers and indexing: These features are imperative because doing proper setup there, a chance to get better ranking in search engine and incorrect configuration can harm your SERP(Search engine ranking position) or you may lose your search engine visibility. So stay away from this part, if you are not expert.

However, if you are keen to optimize your robots.txt and Custom robots header tags, then you can read the post below.

Further Reading – Blogger Advance Search Engine Optimization (SEO) Setup

You just finished essential SEO setups for your blogger blog. Now it’s time to customize your blog.

How to Customize your blogger blog?

In your blog dashboard left panel section, you can see “Theme” and “Layout” option. There you can do your all customization stuff like new template installation or modification, edit or remove blogger widgets, logo setup, text color, and style edit and many more.

How to Start a Blog using Blogger - A Step by Step Guide for Beginners 5

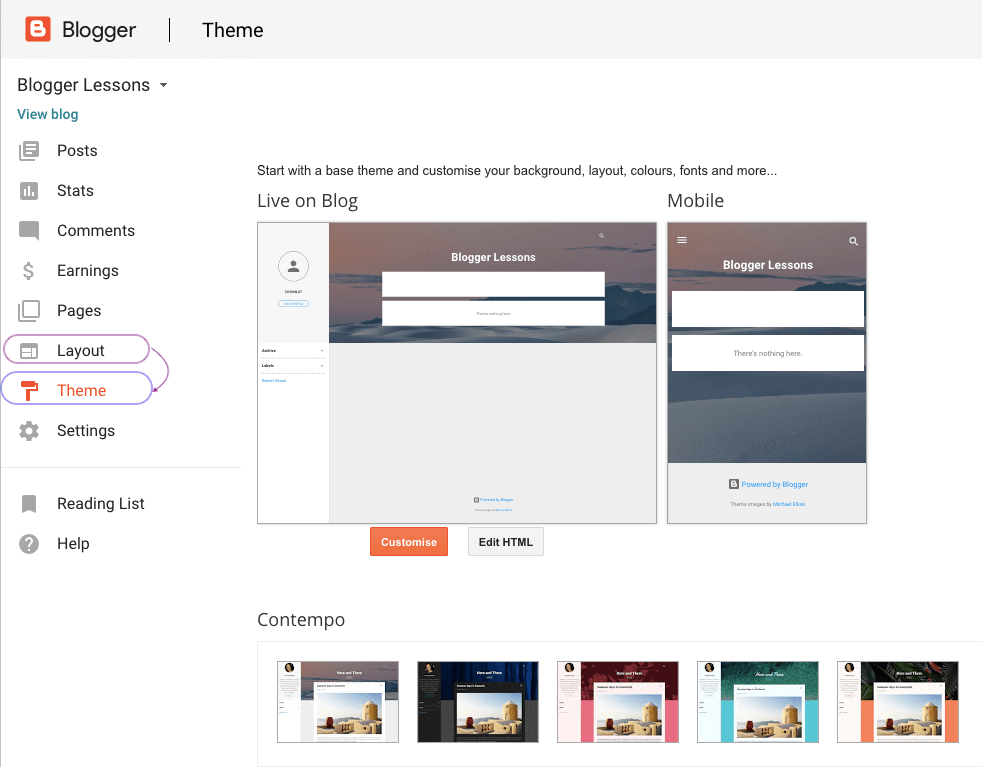
Customization allowed in blogger theme and Layout Section

  • You can Choose a Template from its available templates collection, or you can upload your own theme.
  • Also, you can take backup or restore your blog template anytime by clicking on the Backup/Restore button on the top right side of the Theme dashboard.
  • By clicking on Customize button, a new template editor will open where you can able to make some changes such as changing the background, changing font design and colors, adding Custom CSS, selecting the layout, etc.
  • You can Edit HTML of the template.
  • You can choose a Mobile Template for your site.
  • In the Layout section, you can manage your blog layout by simple drag and drop process.
  • You can see the multiple locations in the Layout Editor where you can add various widgets also.
  • In the layout section, you can edit Favicon, blog header, footer, sidebar, etc.
  • You can use the Blogger Teme Designer to change the layout widths and other settings.

So, I hope you are done finishing your blog setup and customization. Now it’s time to publish some post and pages that drive traffic to your blog.

How to Publish your article on blogger blog

Once you are ready to publish your first article(post), you need to go to “Posts” tab from your blog dashboard and then click on “New Post” or “Create a New Post” link to write your content.

Now you can see blogger post editor. Here’s how the blog post editor screen looks like –

How to Start a Blog using Blogger - A Step by Step Guide for Beginners 6

Now get ready to write an article in a proper format at Compose section. The blogger post editor is similar to the MS Office or Google doc, so it’s very easy working with.

After finishing your article writing chose a suitable post title for it and inserted it on post title area. You can make your article more attractive by adding Headings, Sub-Headings, images, videos, etc. Now when all you are done click on ‘PUBLISH’ button to see your Blog Post live.

Congratulation for your first post! Now you’re ready for blogging.

Keep the process going on and start publishing more contents on your blogger blog. After posting some good stories(or articles), you can apply for Google Adsense approval, or you can try for any other advertising platform. This way you to earn money from your free blogger blog.


Video link: https://youtu.be/tSSK9AKJOeE


Here are a few more things I suggest you to consider when you are running a free blog on blogger.com
  • Use a premium blogger theme on your blog which will make your blog more attractive by its design.
  • Always try to publish original content and if using someone’s speech then don’t forget to credit back to them.
  • Add some pages on your blog like – About, Privacy Policy, Terms of Use, Disclaimer, Contact Us, etc
  • Buy a domain and then setup it for your blogger blog.
  • Create social profiles for your blogger blog on facebook, twitter, youtube, and other platforms.
  • You can set up an SSL Certificate for your blog on Blogspot(Google provide free SSL certificates for all site, and you can easily configure it from your blogger dashboard).

So, this is my complete guide on how to create a blog on blogger. If you have any questions or doubts in mind, don’t hesitate to let me know by commenting below.

If you found this guide helpful, kindly give it a share. Your share is very much helpful to spread our message and help more bloggers like you.


Thank you for reading this.

Hope you like it . 

Share it with your friends and family.


Comments if you have any queries.

Saturday, January 9, 2021

January 09, 2021

Josh App

um Bhi Hai Josh Mein!  JoShort


Original and Exclusive

Josh is ‘Made in India’ for creators of Bharat.

Watch the latest videos of your favorite creators, record and upload your own videos, take part in fun challenges, and become a star! The wait is over. Join us now.

Amazing Effects and Filters

Be Funky. Look cool.

Record your own video and apply unique effects & filters. Add music that you'll love and add more spark to your awesome videos. Get started.

Josh app is one of the apps, riding high in the horde of short videos sharing platforms. The app comes as an alternative to TikTok, which is currently banned in India. We've been seeing a lot of homegrown alternatives to the popular short video platform emerging in recent times. There are a few features that make the Josh app quite unique from others.

This  App is Completely safe to use as it is made by india and it is under the government.

How To Create, Upload Videos On Josh App

Users can begin creating videos on the Josh app and require a few basic permissions.

Step 1: Users will need to permit to access the smartphone's camera and gallery to create videos.

Step 2: You can use the simple editing techniques on the Josh app to make your video more interesting. You can even add music, filters, and more.

Step 3: You will need to log in or create a new account if you do not have one. This will bring out your username on the Josh app, where users can view your videos.

Step 4: Once done, you can upload the video. There are a couple of options while uploading the video. For instance, you can either share it publically with everyone on the app or share it only with your followers.

josh-app-how-to-download-install-and-create-videos-on-josh-app

How To Share Videos On Josh App

Once your video is uploaded, you can share the video on other platforms like Facebook and WhatsApp. Apart from the videos you've created, you can also share videos created by other users, by clicking on the tree-dotted button.

josh-app-how-to-download-install-and-create-videos-on-josh-app

Josh App: Upcoming Updates

Presently, the Josh app is available only on the Google Play Store and might hit the Apple App Store for iPhone and iPad users. The presently available version - 1.0.10 has brought in bug fixes for a smoother user interface. As one of the latest apps in the market, the Josh app is set to compete with other made-in-India platforms like Roposo, Moj, Mitron, and so on.


Josh App: What Is It?

The Josh app is one of the latest additions offering users a platform to create and share short videos. As a made-in-India app, it supports various regional languages like Hindi, Tamil, Kannada, English, and Malayalam. Users can find entertaining videos from various genres and languages, that are trending, funny, glamorous, genres like dance and music, Bollywood, and more. The unique aspect of the Josh app is that it doesn't mandate a login.

josh-app-how-to-download-install-and-create-videos-on-josh-app

How To Download And Install Josh App

Presently, the Josh app is available only for Android smartphones. The app can be downloaded from the Google Play Store. Alternatively, you can even click on this link to download the Josh app. Once downloaded, the app installs on your smartphone and you can begin using the app. The app is sized 7.6MB and is rated 12 years and above.

josh-app-how-to-download-install-and-create-videos-on-josh-app

How To Use Josh App

The app opens to language options, where you can select the language of your preference. Presently, the Josh app supports only Hindi, Malayalam, Tamil, Telugu, Kannada, and English. Once you select the language, the app opens to the homepage, where you can see the short video

Watch the Exciting Josh Anthem

Available in multiple languages

हिंदी, ಕನ್ನಡ, தமிà®´், à°¤ెà°²ుà°—ు, മലയാà´³ം, मराठी, ગુજરાતી, বাংলা, ଓଡିଆ, English